WIMP on Windows 7 – Windows, IIS, MySQL and PHP
In the past it was always a bit challenging to get WIMP installed, at least for me it was. I ended up using installers for PHP and even then which version would I use, fast cgi or that other one (can’t seem to remember the name, it’s been a while). Recently, I had to create an environment that uses WIMP. I had to take old data from MSSQL 2008 and convert it over to MySQL. I tried to use MySQL Workbench’s migration tool but it failed on 5 of the tables. So my plan is to use PHP and somehow import the data over. Well I would need to use SQLSRV driver for PHP5 to connect to MSSQL 2008. Enough of the back story, here’s what I did.
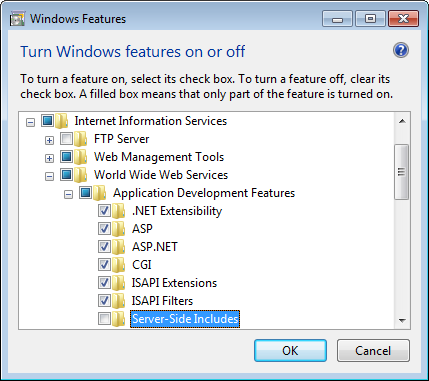
First off, I am using Windows 7 Professional 64bit. You will need to enable IIS in the Control Panel by turning it on in the Windows features. Here’s what mine looks like.

You don’t need all of the checked features but you will need CGI under Application Development Features – this is how PHP will run within IIS. Leave the others default. Once installed, there may be new Windows updates related to what you just enabled. It’s a good idea to patch them up. The version of IIS I’m running during time of writing is 7.5. Screenshots and feature location may differ from your version.
Now download PHP5 the version you wish to use from http://windows.php.net/download. What I downloaded and used was 5.4.27. I needed a version from 5.4 because of the SQLSVR I mentioned earlier. I haven’t tested to see if the driver works on PHP5.5+. Also, you want to download the NTS (non-thread safe) version. In my case, it’s VC9 NTS for PHP5.4.27. Unzip the file and put it in C:PHP5. You can put it anywhere but I just wanted it more accessible.
Inside this folder, look for a file called php.ini-development. Copy and rename the file to php.ini. I chose development because my environment is for development only. There is a production version with slightly different settings.
Here are the entries that need modification within the php.ini files.
- extension_dir = “ext” (enable this if you’re going to use extensions)
- fastcgi.impersonate = 1 (enable this)
- cgi.fix_pathinfo=1 (enable this)
- cgi.force_redirect = 1 (enable this)
Save the file and close it.
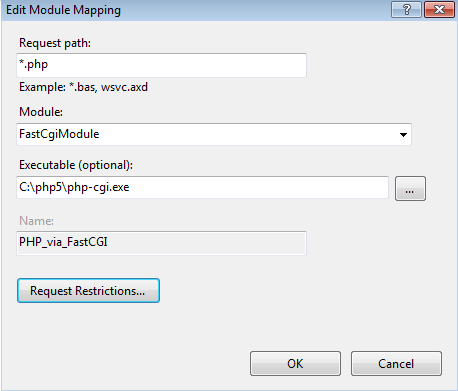
Now we need to let IIS know how to serve PHP pages. Open up IIS Manager. Highlight the entire Server to apply to all websites hosted or specific ones – in this case, highlight Default Web Site. Next, double-click on Handler Mappings and Add Module Mappings. Here’s how mine looks.

Restart IIS. Create a test file using phpinfo(). You should see something like this if all is in working order.

To install MySQL, just download an installer from http://dev.mysql.com/downloads/windows/installer. The great thing about the installer is that it comes with other goodies such as MySQL Workbench and connectors such as ODBC (which I needed to get the migration tool from Workbench to connect to MSSQL server). If you are going to use MySQL, don’t forget to enable the extension(s) in the php.ini file. You can find more detailed instructions from http://www.iis.net/learn/application-frameworks/install-and-configure-php-applications-on-iis/using-fastcgi-to-host-php-applications-on-iis.
One Comment